Additive mass manufacturing technology
Our additive manufacturing technology is used to form green bodies, which can later on be thermally processed or sintered to be transformed into final parts with the desired properties. The build process consists of the steps 2D printing, assembling and cleaning. For large volume production systems, these 3 steps can be implemented independently in different units, which work together in the fabrication process. Alternatively, all 3 steps can be included into one machine.
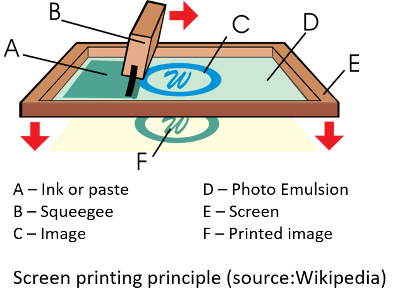
2D printing
The first step consists of generating 2D patterns of a paste, containing the desired material for the part, onto a flat intermediate support structure. Here conventional 2D printing technologies can be used. For a good combination of printing speed and pattern accuracy, we are using screen or stencil printing. However other 2D printing technologies such as paste dispensing or ink jet printing could be used aswell
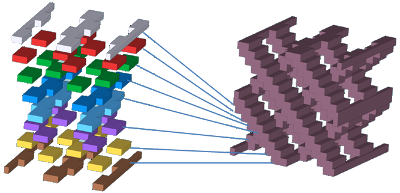
Assembling
In the second step, the 2D patterns are assembled to 3D parts. First the printed 2D pattern is correctly positioned relative to the partial 3D part being built. Then the pattern is contacted to the partial part. Next the paste of the pattern is hardened. This can be realized by radiation, by heating, by drying or by a chemical reaction. While the pattern is hardened, the intermediate support is still in place making sure that the printed pattern keeps its shape and position. Finally the intermediate support is removed leaving the hardened pattern attached to the 3D part being built
Cleaning
In a last step, the intermediate support structure has to be cleaned before it can be reused for printing another 2D pattern

Features
Accuracy and Resolution
The accuracy of the printed patterns depends on the accuracy of the screen or stencil used. Typically lines with width of 100 microns or finer are possible.
The positional accuracy depends on the size of the print as well as on the technology used to fabricate the screens or stencils. Positional accuracies of 50 microns or better can typically be achieved
Size
The 2D printing process determines the maximum size of the print base plane. Screens or stencils can in principle be manufactured up to large sizes. With increasing size of the print cross section, the positional accuracy within the print suffers, which limits the maximum size to be realized.
It is possible to use printed cross sections of 1m² or larger.
The maximum build height of the parts depends on the construction of the assembly unit only and can be designed to meet the requirements of most applications
Throughput
For optimum throughput, n printing units can be combined with m assembly units and p cleaning units. The throughput depends on the assembly frequency, the number of assembly units running as well as on the size of the printed patterns used.
With a build area of 300mmx300mm, a throughput of ~10’000 cm³/h can be realized with one assembly unit
With a build area of 1000mm x 1000mm, a throughput of ~100’000 cm³/h can be realized with one assembly unit
Voids within the parts
The printing scheme only places material where it is needed to form the part. Therefore there is no need to clean voids within the part after the printing process. This means that complex capillaries or completely closed voids can be realized without a problem
Materials
Materials we focus on are those which are suitable for powder forming. They include metals, ceramics, glass and composits. But the technology could also be used to directly produce plastic parts
Multiple materials
Parts consisting of multiple materials can easily be realized by assembling 2D patterns printed with different pastes containing different materials.
If a thermal treatment of the printed part, such as sintering, follows the assembly process, the different materials must of course all be suitable for the same thermal treatment process together within one part.